The purpose of this document is to give complete instructions on how to use the POS module of Infusion software. This document should be read in conjunction with the Infusion Help Manual particularly when setting up POS defaults as outlined below. This is found in Infusion under the Help Menu or by pressing F1.
POS Defaults
Before beginning to process Sales POS Defaults need to be setup under the POS menu. Note that these settings need to be set up in POS Defaults individually for each workstation with a separate PC login that is using POS within Infusion.
Preferences
The minimum fields that need to be specified are:
Cash Sale Account, Undeposited Funds, Unders/Overs and Location.
Failure to have a Location setup will result in an "Invalid Subscript Error". Settings also need to be entered for any hardware being used for POS.
Quick Methods can be set as payment options for the F5 and F6 keys on the POS main screen. Options for this are set in Admin / Setting / Manage Banking Methods. In the above example they have been set to Payment Types 'American Express' and 'Mastercard'. Payment Type can be set as a Quick Method.
Drawer ID If using more than one POS computer in the same building, it is recommended that a common ID is given. If this is done, then only only drawer will have to be removed each day instead of multiple drawers.
But if you wish to keep the contents of each drawer separate do no do this.

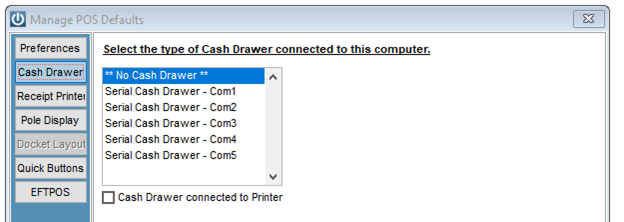
Cash Drawer
Within the Cash Drawer tab select the type of Cash Drawer that is connected to your computer. For a Cash Drawer that is connected to the COM port select the COM Port being used.
If the Cash Drawer connected to Printer tickbox is selected the Cash Drawer will open (eg to receive Cash or a Cheque) when the Receipt Printer is printing at the end of a sale.
Receipt Printer
Within the receipt Printer tab select when you would like the docket/receipt to print along with the Docket layout settings. The Docket Layout selected determines the settings which need to be setup. When setting up the POS system for the first time the Number of copies defaults to Zero. This must be changed.
Docket 40 Column is for a Receipt Printer.
Selecting this printer will allow a user to change the prompt to print, grouping of products, and gives the option to email the invoice if the Customer has email defaults set up.

True Type is A4 Paper
Tick boxes on the left change to allow the user Print the Company Name on the Top and Loyalty info.
The Layout is selected from the drop down box.

Pole Display
Open Message and Close Message fields allow a message to be entered that will display when POS is open and closed.

Docket Layout
This is only active if the Docket Layout is selected.
Within the Docket Layout tab, fields that appear on the Docket Header, Footer and Detail fields can be selected including message fields.

Quick Buttons
From the Quick Buttons tab 20 button can be configured for use on the POS screen

These buttons will display at the bottom of the POS screen and can be selected by either clicking on them or being used with a touch screen.
To activate this option first select the Activate Quick Buttons tick box. Next select the Price Level to show on the buttons from the drop down box.

Selecting the button to be configured will display the setup screen.
Two lines of text can be entered to display on the button. It can also be configured to a fill colour by selecting the display box and choosing from the palette. Remove the colour by selecting the Reset button.
An image can also be set to display on the button.
The button can be set to either be a Product which when selected will add the item to the POS entry screen and the cursor move to the Code field of the next line. Select the Product from the Product Code dropdown box to set this.
Alternatively the button can be set to display a range of Products by selecting the Lookup radio button. Select the range of Products from the Type, Group and Code options. A title can be set for the popup screen by entering text into the Lookup Screen Title field.
The Copy button at the bottom left of the Manage POS Defaults screen allows the settings from another POS user to be copied over to the current user. A Terminal ID needs to be selected to copy from. The Terminal ID of a user can be found on the Help / About screen.
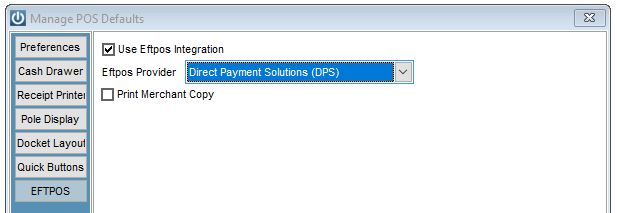
EFTPOS
The EFTPOS section is for Integrated Eftpos and has specific instructions. Please see the related articles.
POS Processes
The POS processes covered below:
- Processing a Sale
- Using the Cash Out (Petty Cash) function
- Removing a Cash Drawer
- Balancing a Cash Drawer
- Preparing Daily Bankings from POS
- Reporting on POS Sales
Processing a Sale
The processing of all sales is done from the main screen.
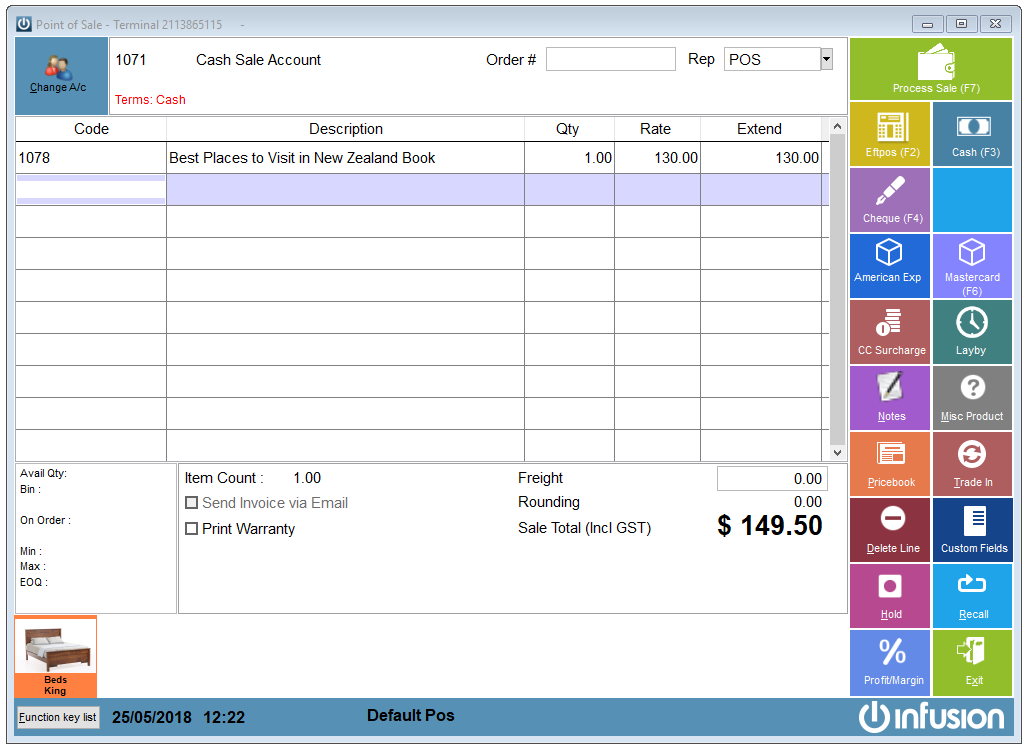
In the above window we can see a Product has been entered into the system and is ready to be sold.
A Product Code can be entered in the Code Field in several ways:
- Manually typing the Product Code.
- Using the F9 key to lookup the Product Code.
- Scanning the Product using a Barcode Scanner (while the cursor is in the 'Code' field).
- Using the Quick Buttons
Note: The Code field is designed to pick up both Product Codes and Barcodes, in that order. Scanning, typing or using F9 will search first for a matching Product Code and then, if no matching product code is found, the software looks for a matching Barcode. Products which have the Product Code the same as their Barcode are fine, but where a Product has a Product Code which is identical to another Products Barcode this will cause a problem.
You can enter a Product into this screen using a Barcode Scanner, scanning either the product code or the barcode for the Product.
If Quick Buttons have been set up you can either click on them with the mouse or if you have a touch screen, press the required buttons. If a button has been set up for a Product then after selecting it the Product will be added to the entry screen. If the button has been set up for a range of Products a pop up will appear eg

from which one of the items can be selected.
If you have selected or scanned the wrong Product use the Delete Line button to clear the entry.
At the bottom of the screen is a Sale Total (Incl GST) amount showing the total sale amount of all Products. The ability to alter rates and/or enter discounts is controlled by the POS Defaults settings and the user logged on.
There are a number of ways a Purchase can be paid for depending on how the Payment Method buttons on the right hand side of the screen are set up.
If upon selecting a Payment Method for the transaction you get a message saying “Staff Code Required” enter your Staff Code in the Rep field found at the top of the screen by using the down arrow or typing it in.
Following are some basic payment type scenarios:
If the Customer is paying by Cash select the Cash button which is Cash (F3) in the above diagram. You will be asked to input how much Cash has been tendered (received).
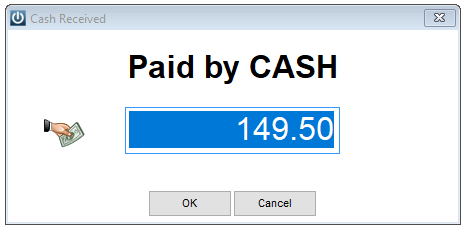
In the above example the rounded cash value of the sale is $149.50. Enter the amount the Customer actually hands over in cash in the above screen (in this example they have paid $160.00). Select OK and a window will appear telling you how much change is required from the Cash Drawer. Make note of this as soon as it appears as the window will remain visible for only 10 seconds.

Note: if the amount tendered is entered incorrectly then the Change Due will also be incorrect. You do not need to make any adjustments other than giving the correct change for the actual amount tendered.
If the Customer is paying by Cheque select the Cheque (F4) button. You will be asked for the Amount on the Cheque and then the bank and branch details from the Cheque. Enter these in and select OK.
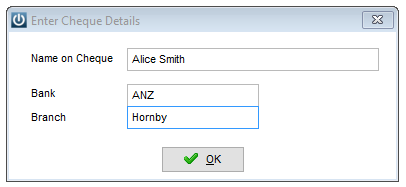
Enter the details for the cheque and select OK.

A pop up will then appear with the amount of change required (if any). If the OK button on this screen isn’t selected it will disappear from the screen after 10 seconds
If the Customer is paying by EFTPOS, after selecting the Eftpos (F2) button you will be asked for the Amount of the EFTPOS transaction. When this has been entered correctly click OK.
If the Customer selected for the sale has an account then the Account(10) button will be available as a payment option
Two other payment methods can be set up under the Quick Payments Methods in POS Defaults. In the above main POS screen these are set to American Express or Mastercard. More can be added to the selection list from the Admin / Settings / Manage Banking Groups menu.
The Process Sale option allows multiple methods of payment to be used for a sale. The available methods will depend on what has been set up under Admin / Settings / Manage Banking Groups and if the Customer account being used has any credit terms.

Other Quick keys allow data to be entered quickly into the POS screen. The Notes tab displays a pop up box that text can be typed into. These notes will be printed on the receipt docket.
Selecting the Misc Product button will add the product code MISC to the entry screen (if has been set up in the Products list).
The Pricebook button prompts for selection of a Pricebook an item can be selected from.
Selecting the Trade In button will prompt for entry of details for a Trade In item which will be entered onto the main screen to process as part of a sale.
If a Product is erroneously entered onto the screen the Delete Line button can be used to remove if (if the cursor is sitting in the required line)
The Hold button allows a sale to be put on hold (so another sale can be processed). The Recall button will recall any Held sales for the selected Customer. Invoices can only be Recalled for one day, following that they must be processed from the Manage Invoice screen.

The Custom Field button prompts for entry of data into six text or two date custom fields. These are set up under the Admin / Defaults / Mange Customer Defaults / Invoice Fields menu.
Selecting the Profit / Margin button will show the Total Cost and Sell values for the current sale along with Gross Profit, Margin and Markup. The Hide Costs option needs to be unselected in Admin / Defaults/ Manage Product Defaults for this to display.

The Exit button exits the user out of the POS screen
The Function List button at the bottom left of the POS screen displays Function Keys and Special Product Codes useful in processing a sale.

The Quantity Buildup option allows multiple unit of measure variations (eg 2 x 4 metres, 3 x 2 metres) of an item to be entered and the resulting quantity on the line will be the sum of these.
The Lookup Prices option displays pricing information for the selected item. The price used on the line can be changed by selecting one of the radio buttons on the left hand side the pop up screen. Last Sale and Receipt dates are also shown (This screen is only active if the Allow Rate Changes Default is active).

The Enter $ Discount option allows a dollar discount to be entered. This will display as a percentage figure in the Discount column.
The Lookup Previously Sold Products option allows viewing of a list of items previously purchased by the selected Customer.
Processing Sales from the Invoice/Quotes menu
While logged in as a POS user sales can also be processed through the Enter Invoices option under the Invoices/Quotes dropdown menu. When processing a payment for a Customer the POS payment screen will display

Sales processed this way will also be included in the Cash drawer.
Giving out Cash With Eftpos
If a Customer wants Cash Out with a Sale in conjunction with an EFTPOS:
After selecting the Eftpos button you will be asked the amount of the EFTPOS transaction. The sum of this amount will be the amount of the purchased Product(s) and the amount of Cash being issues to the Customer.
For example a Product has being entered in with a Price of $50 and the Customer also wants Cash out of $40 then the Amount of the EFTPOS purchase will be $90. Once this is entered click OK. The Change Due window will appear saying that $40 change is due. From here issue the Customer $40 Cash from the Cash Drawer.
Note that on the Cashup Docket this transaction will be recorded as a $90 EFTPOS sale and -$40 as Change Given.
Returned Items
If a Customer has returned Goods or an error has been made in the Sale you can credit/reverse the transaction. Do this by entering the item into the POS window and in the Qty column simply enter a negative balance eg for one returned item Qty = -1. This will update your stock on hand as the Product has been received back in. This will also make the payment amount a Credit.
- Customers who were charged using their Account will not need to be issued any Cash as their Account will be credited for the return.
- Customers who paid by Cash will need to be given their Cash back and this will appear in the Refund Due window upon processing the sale.
- Customers who paid by Credit Cards/EFTPOS will need to have their Credit/EFTPOS card refunded on the EFTPOS machine as well. Again a change due window will appear stating this Amount.
- Customers who paid by Cheque cannot be refunded this way so it would be wise to record the refund as a Cash Sale.
Reprinting a Docket
Should you need to reprint a docket for yourself to retain or for the Customer simply select Reprint Docket from the POS dropdown menu. It is a good idea to retain a Docket for each sale you make so print out two copies of a Docket as mentioned in the POS Defaults in the Receipt Printer. Note only Dockets that have been generated on the same day can be reprinted so make you sure you have all the dockets matching the Cash Drawer Itemised Report at the end of the day.
Petty Cash
Should Petty Cash need to be used eg for buying a bottle of milk for the office and Cash from the Cash Drawer is needed, from the POS dropdown menu select Cash Out (Petty Cash). The following window will appear.

Input the Amount of Cash used, the Expense Code in the G/L that this will be coded to and a Note (optional) for what purpose. Petty Cash withdrawals will show up on your Cashup Docket. Take care to be consistent with the General Ledger codes being used.
Removing the Cash Drawer
Prior to removing the Cash Drawer, it is recommended that users go to POS / Reports / Drawer Contents Report / All Drawers and check all transactions. The report will clearly outline what is expected to be in the till, including any cash taken out for petty cash or cash give out when a payment is made by Eftpos. Check the Eftpos slips against what is on the report, any that are missing or incorrect can be followed up and corrected at this point. Count the cash and ensure this is correct.
When this report is correct, proceed to Remove the Cash Drawer.
In doing this you will then be asked if you wish to print an Itemised Report (Cashup Docket). This is recommended as it shows all the sales made for the Cash Drawer. Attach all Eftpos dockets and cash to the report. Leaving just the Float in the till.
Note: Sales that were made by being charged to an Account do not show up on this report.
Balancing a Cash Drawer
When you are ready to Balance a Cash Drawer once it has been removed, under the Cashbook dropdown menu select Balance Cash Drawer. A window will appear listing all unbalanced Cash Drawers. This process must be completed for each Cash Drawer. You also have the option of reprinting an Itemised Report for a Cash Drawer. You will need this to track and record different payment type amounts.
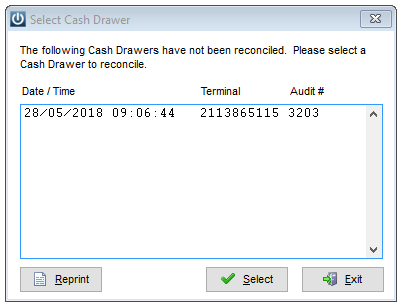
Select a Cash Drawer to balance and the following window will appear:
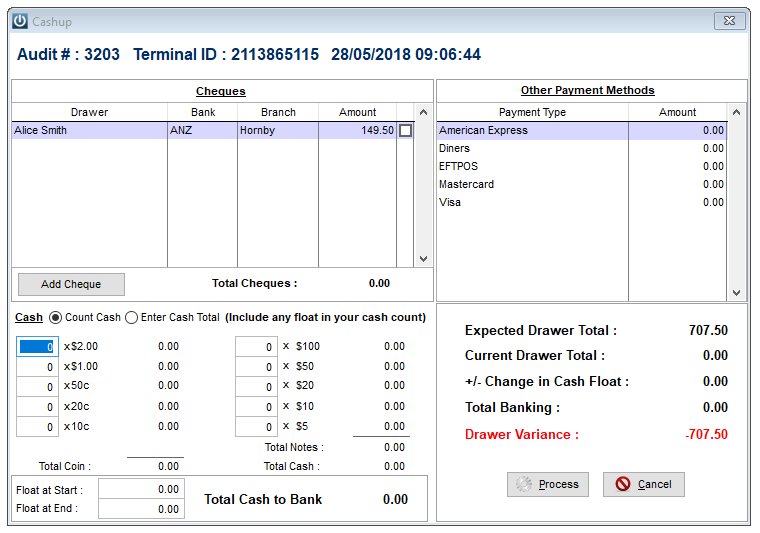
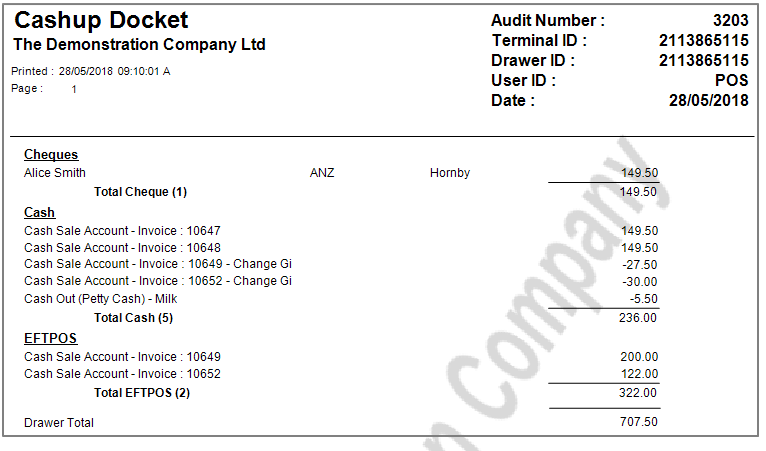
In this example $707.50 of sales need to be accounted for. The Cashup Docket details relating to this are:
First account for the Cheques. The Amounts are showing in the Cheques table. Each Cheque including Payer Details and amount will be displayed in this table. In this example we have received one Cheque through this Cash Drawer. Tick the tick box to the right of the Cheque amount to include in the Daily Banking. The Current Drawer Total figure and Drawer Variance figures will be updated.
Next to account for any Cash received. This can be done two ways either by selecting the Count Cash option where you will have to input the quantity for each note and coin value or by selecting the Enter Cash Total option in which you enter the Total Cash figure showing in the Cashup Docket. If there was a float and this is being tracked enter the Float at Start and Float at End values.
Lastly to account for the Other Payment Methods field. In this example there are two EFTPOS and no other transactions. But if there were, these would be entered into the Total amounts for these in their respective payment method Amount fields.
Note: as mentioned Sales by Customer Account do not show up on the Cashup Docket and therefore do not show up in the Balance Cash Drawer window.

Upon completing these steps our Current Drawer total should equal our Expected Drawer Total and our Drawer Variance should be zero. If the Cash Drawer Variance does not equal zero and it cannot be accounted for (eg a Staff member using Petty Cash and not recording it in the Cash Out (Petty Cash) function), you can still balance the Cash Drawer. If the Variance is greater than $5 you will be asked for a reason. These Variances are posted to the Unders/Overs Account and can be journaled out in Financials if the reason for the variance is discovered. Click Process to balance the Cash Drawer.
See this article on correcting a Variance in your Cash Drawer
Preparing the Bank Deposit
To deposit the proceeds of a Cash Drawer from the Cashbook dropdown menu select Prepare Bank Deposit.

Select the same Bank Account you selected when you processed your balanced Cash Drawer. The Banking Type you select will depend on which Banking Methods you have assigned to Banking Groups (in Manage Banking Groups under the Admin dropdown menu).
Note: the Banking Date is selected before entering the next screen.
The Cash Drawer we have balanced has Banking Methods (Payment Methods) that are assigned to different Banking Groups as shown below.

In this Prepare Bank Deposit example we have selected the Banking Type Daily Bankings which has given us the following screens:

From here we can see the Cash and Cheque Amounts corresponding to our Cashup Docket. Tick both of these using the far right tick box beside each Amount. Selecting Save will save any amounts ticked and exit the screen. By selecting Close Off a Deposit slip can be printed out.
Next the EFTPOS transactions for the Cash Drawer need to be deposited into the Bank Account also. Note that any EFTPOS transactions from late Friday night and over the weekend will not show up in real time in the Bank Account until Monday. Again from the Cashbook dropdown menu select Prepare Bank Deposit and this time select the same Bank Account but for Banking Type EFTPOS and then Select.
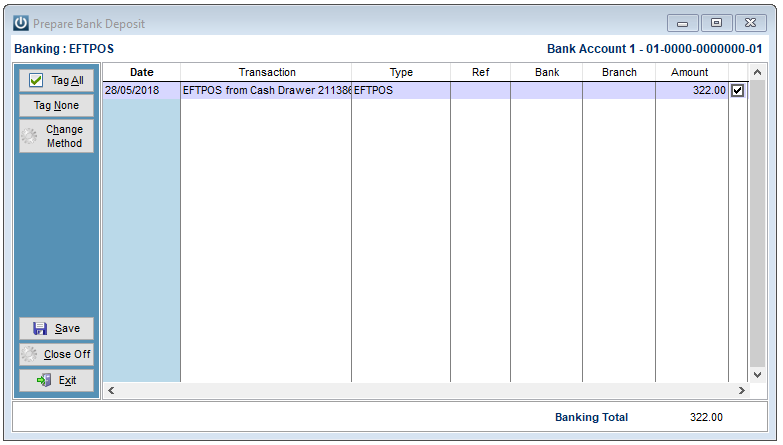
The Prepare Bank Deposit window will again open displaying all Undeposited Bankings for EFTPOS.
Tick the EFTPOS amount to show it being ready to deposit and then select Close Off. The system will again prompt for a Banking Reference and to print a report for EFTPOS bankings. You can retain these for your own records or use them as supplementary banking information when going to the Bank to deposit Cash Drawer contents.
These Bankings will now appear in the Bank Reconciliation as Daily Banking's and the EFTPOS Banking Groups.
Reporting for POS
Under the POS dropdown menu in the Reports section a range of Reports are available.
Drawer Contents: This prints a report for the current Cash Drawer or all Drawers being used in POS. This will display payment totals for each of the payment types received.
Hourly Sales: This displays Hourly Sales for a selected date. This can be useful for measuring busy times during the business day. Again it can be run from the current Cash Drawer or all Drawers.
POS Sales: These reports display Sales information in one of four Report ways.
Summary - Displays a list of all Sales for all Cash Drawers for all Payment types for all Staff Member over a specified date range, useful for tracking all Sales over a given period.
By Staff – Displays a list of all Sales processed by each Staff Member over a specified date range, useful for tracking individual Staff Member sales totals.
By Customer – Displays a list of Sales for individual Customers over a specified date range, useful for tracking Cash Sales or making note of regular Customers that could receive a discount in future sales.
By Product – Displays a list of Sales for each product sold over a specified date range, useful for tracking high/low volume sales for a Product(s).
Pending POS Sales: These reports display Pending Sales information which can also be displayed in one of four Report ways ie Summary, By Staff, By Customer and By Product.
Note: As mentioned Pending POS Sales are created using the Hold key. They will be displayed in Pending POS Sales reports. To complete a Held sale use the Recall key then process the payment. Completing a Held sale will remove it from the Pending POS Sales report data and add it to the POS Sales report.
Comments
0 comments
Please sign in to leave a comment.