Note: This utility only works on Manual Pricing, it will not work for Product Groups Markups.
OVERVIEW
The new price update utility combines updating Standard or Promotional Prices and updating Promotional Dates previously in two separate utilities.
Additional filtering is available and an additional feature allows you to preview the changes to be made and de-select individual products from the update.
To access:
Products > Update Prices / Promotional Dates
Key features of the utility.
1. Filtering
In the top section of the utility the standard filtering options are available.
Code, Barcode, Preferred Supplier, Latest Cost, Product Type, Group and Subgroup
2. Destination Price Level
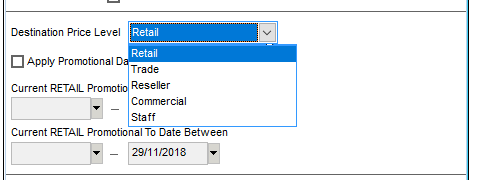
The next section asks which is the Destination Price Level.
This is the price level within Infusion that you are going to update. For Example:
Retail or Trade or Reseller.
3. Promotional Price Filters
Once the Destination price level is selected you are able to further filter on the Promotional Price Dates for the Destination Price Level.
4. Price Update Specification
The bottom section allows updates to either the Prices or the Promotional Dates, or both.

DETAILS
To Update Prices and / or Promotional Dates
Apply Product Filters
- Enter filters for Product Code, Barcode, Preferred Supplier, Latest Cost. (All Optional)
- Enter Filters for Product Type, Group, Sub Group. (All Required). To Select All simply click the Select All and click the Save icon.
- Alternatively select the Types, Groups, Sub Groups required individually and click the Save icon. You must select at least one option for each of these categories. This is designed to ensure that you do not select products in error.
- Include Inactive Items if required.

Select the Destination Price Level
Select the price level you wish to update. Only one price level can be updated at a time.
Apply the Promotional Dates filters if required.
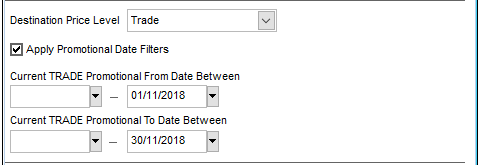
This filter is designed to allow selection of only products that have Promotional Dates loaded. This allows selection and updating of products that have expired or future promotional dates. A product must meet all date filters to be selected.
Note:: A blank value is treated as “the beginning of time”. Entering a date of “TODAY” to “BLANK” will return no products as “BLANK” is before “TODAY”.
The example below selects any products with a Promotional Date for the Trade Price Level where the Promotional “From” date is on or before 01/11/18 and the Promotional “To” date is on or before 30/11/18.
Set the Update Prices Parameters
Note: You can update the Prices or the Promotional Dates or Both. You must select one or the other to enable the Preview button.
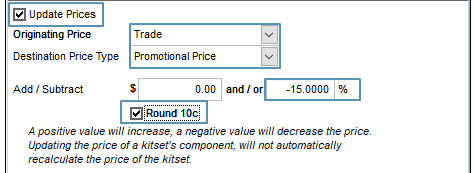
Select the Originating Price Level. This is the price level that will be used to calculate the new value for the Destination Price Level.
In the example below 15% is subtracted from the Trade Standard price to update the Trade Promotional price. The new price is rounded to 10 cents.
Set the Update Promotional Dates Parameters
Note: You can update the Prices or the Promotional Dates or Both. You must select one or the other to enable the Preview button.
Add the Promotional Dates to update the Promotional Dates for the Destination Price Level.
In the example below the Promotional Dates are updated to run from 1st to 31st of December.
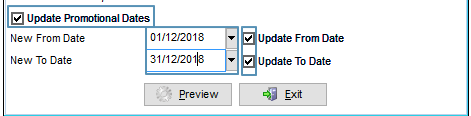
Note: Leaving the “New From Date” or “New To Date” field blank, and clicking the update box will clear any current Promotional Dates.
Click Preview
Preview Screen
- The Header section displays the selections made in the previous screen and is not able to be edited.
- The list of products below is all products that meet the criteria of the selections made.
Using the example filters above products that meet the following criteria are listed:
- Any Product Code, Barcode, Preferred Supplier or Latest Cost.
- All Types
- Selected Groups (click on the arrow to see the selections)
- All Sub Groups
- Promotional From Date on or before 01/11/18 in the TRADE price level.
- Promotional To Date on or before 30/11/2018 in the TRADE price level.

Searching and Sorting
Resulting products can be searched and sorted in the same way as the Manage Products screen.
Deselecting Products
A product can be excluded from the Update by double clicking on the relevant row. The check box will become unticked.
Other Selection Options:
Select All products or Select No products using the options at the bottom of the screen.
Hide the Deselected records from the list.
Resulting Records:
We can see how many products were selected initially, and how many remain selected.

Updating or Cancelling
To Cancel the Update click Cancel. The original selection screen is now available.
To Update the selected products click Update.
A prompt asks you to confirm the update.
Click Ok and then Exit once the update is complete.
Article
Comments
0 comments
Please sign in to leave a comment.