Overview
Infusion Mobile works through having software (the Sync Tool) installed on the same computer the Infusion software data file is on. This Sync Tool communicates with a web based site. It is this site that users log in to from their smart devices using a web browser.
Home Screen
The Home screen displays the menu options available to the user on the left hand side. What displays here is dependent on the Profile setting for the logged in user.
The Recent section will show the last viewed or edited Customer, Lead, Job or Potential.
The timer at the top of the left hand menu bar shows how long since the last sync of data. How frequently this happens is set on the sync tool installed on the computer Infusion resides on.
The name of the logged in user displays at the top right of the screen.
User Setup
Like Infusion software, Infusion Mobile’s licensing works on the number of concurrent users logged in. While the module may be licensed for three users, any number of users can be set up as long as only three log in at the same time. Each user has a username that is their email address and a password created when an Admin user creates their account.
To set up a new user, log in as an Admin user (the account used when the site was created will be one) and setup the following:
Permission Profiles
Each user in Infusion Mobile has a Profile set against their account. This will determine the menu options and functionality available to them when they log in. To set up a Profile go to:
- Settings / Permission Profiles
- Select + (or click on an existing Profile)
- Name the Profile eg Tech and select the appropriate menu options relating to this.
Setup User
To setup a User go to:
- Settings / Setup Users menu
- Select +
- Enter an email address (this will be used as the username for the account)
- Enter the name of the user
- If the user if going to be allowed to edit system settings select Yes for Admin Permissions otherwise leave as No
- The Repcode is used to filter lists in Infusion Mobile to those just associated with the user. The Repcode needs to be the Staff Code used in Infusion.
- The Labour Code entered will be used as the Product Code added to a Job when the Timer option is selected.
- Setting the user up against a Location will mean any Quotes or Invoices created in Infusion Mobile by the user will be set against this Location – for Invoicing stock will therefore come out of this Location. Items added to a Job will come out of the Location set against the user account.
- Set the required Profile so the appropriate menu options display for the user.
- Enter the Product Group for the Labour codes for the user. This setting affects the data displayed in the Job / Timesheets screen.
- A Supplier account can be set against a user account. When done, a Purchase Order created by the user will always use the selected account as the Supplier.
- The Customer and Fergus ID settings relate to the Trade Portal. See the support document for this for more information
- The user’s password can be set / reset in the Set Password fields
System Setup
For Quotes / Orders / Invoices emailed from Infusion Mobile, the header detail is taken from the Settings / Registered Company menu.
A logo can be used on Quote / Invoice and Job Proforma Invoice layouts. This is also set under the Settings / Registered Company menu.
A session timeout for users can be set. Users will be automatically logged out after this time if there is no activity in their session. The value for this (in seconds) is set from under the Settings / Mobile Site Settings menu. The default is 3600 seconds / 1 hour
Outlook integration
In a Calendar event in Infusion Mobile there is an Export button at the top right of the screen. This option allows you to enter in up to 5 email addresses. These email addresses are sent as an Outlook appointment request. They are sent as a .ics file. Opening and saving these from the email sent to Outlook will create an Outlook Calendar event that includes the Notes written in Infusion Mobile.
When this is received in Outlook, the user can accept the meeting and it will be added to the calendar. Changing the date / time of the appointment in Infusion Mobile won't change what’s in Outlook. The two items are not permanently linked
Syncing
Customer notes will sync from Infusion to Infusion Mobile. Notes added from the Notes tab at the top of the Customer screen in IM sync back to the Contact Management module.
Contact Management events in Infusion will sync the Customer \ Notes menu in IM.
Quotes will sync back to Infusion when the Sync icon in the Quote screen is selected.
Searching
The Customer and Leads Search looks at the first and last name of the contacts associated with the accounts.
Text field 1 on Products can be used for a second Product code or Barcode for searching on.
Product Codes and Descriptions can be searched with complex searches. Words can be in any order.
Potentials can be searched on using any part of the Potential Note or Title fields
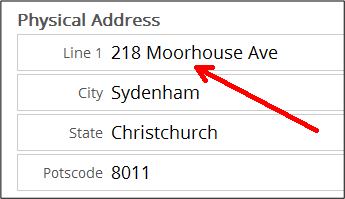
Jobs can be searched on using any part of Job Title, Description, Name, Physical Address Line 1 and 2, Physical City and State, Phone Number and Email Address
Customers and Leads can be searched on using any part of the Name, Account, Physical Address Line 1 and 2, Physical City and State, Phone Number, Mobile Number and Email Address.
Customers
In the Customer list screen the Rep code displayed against the account comes from Infusion.
Managers see records of all users below them.
If a Rep code has been set up against a login the user can be set to just see records they are associated with. There is also a Profile setting to Show Unallocated Records.
A user’s Repcode can be set or changed without a sync and the new filtering will apply.
Customers can be deleted from within Infusion Mobile if there are no Jobs, Quotes or Orders linked to the account. The Delete option is available from within the Customer account. A warning will be given if there are any linked items to the account.
History
The number of days of History shown under a Customer’s account is set to 180 by default (6 months). This can be changed to any number of days. It will have an impact on the amount of traffic sent.
The scripts to change are invheader.sql, invlines.sql and history.sql
Geo Locate / Nearby
Customers with a Tag showing to the left of their name in the Customers list screen have been Geotagged and will be available to be seen in the Nearby screen.
By clicking on Customer Address Details in a Customer Account or Job a Google Maps screen will open displaying the location of the Customer.
The address is initially indicated by a box with a down arrow ie

Selecting Confirm for the Customer will change the icon to

Only confirmed Customers show on the Nearby screen
Selecting Target will centre the Customer’s address on the screen
Selecting Current will centre the Infusion Mobile user’s location on the screen
Selecting Geotag will set the user’s current geolocation to be the Customer’s current address
Creating Quotes / Orders / Invoices
The Rate on an Order will automatically be allowed to be overwritten if the rate is set to zero in the product list
Signatures can be captured for Orders, Quotes and Jobs
An Item can be added and edited at the same time in Quotes, Orders and Job Costing. If this option is turned on (from Invoice and Quotes Settings) the increment quantity option doesn’t display.
The Cost price on an Invoice line item is set to Latest or Average matching the Infusion default settings. This can be edited (if Profile permission is given) by clicking on the line item. If the item has no cost the Sell rate will display in red.
Setting the MISC Item code in Quote and Invoice Settings activates a menu bar option to quickly add miscellaneous charges.
Orders / Invoices created in Infusion Mobile can be emailed to the Customer and the logged in user when the Order option is selected.
Invoices / Orders in Infusion Mobile will sync to the Pending Invoices screen of Infusion when Processed. An Invoice Number from Infusion Mobile will populate the Invoice Ref field in Infusion.
Quotes created in Infusion Mobile can be emailed to the Customer and the logged in user through the Process Quote option. After this has been done a Sync option will display when in the Quote in Infusion Mobile. Selecting this will sync the Quote to Infusion. Once a Quote is synced to Infusion a copy of it (that can’t be edited) remains in Infusion Mobile. Synced Quotes are indicated by a green tick next to the quote icon ie

Inactive Products cannot be added to a Job or Quote / Invoice
Orders, Quotes and Job Costs will allow rates up to 4 decimal places. Totals are rounded to 2 decimals for each line after multiplying by the quantity.
The Quick option is a list of items previously purchased by the Customer and displays one year of history by default.
The discounts setup in Infusion (including the discount matrix) will be applied in Infusion Mobile. Any other discounts applied in Infusion Mobile will sync back to Infusion.
Serial Tracked items entered onto Invoices will sync from Infusion Mobile back to Infusion. For this to work the Product must be set to "Track Sold Serial Numbers" only. The serial number is entered in manually.
Notes entered into the Header section will be displayed on emailed copies of these documents.
Jobs
Job Description Notes in Infusion Mobile sync back to the Instructions tab of a Job
Instruction Notes in an Infusion Job sync to Description of the Infusion Mobile Job.
Tech Notes in Infusion sync to the Notes in Infusion Mobile (Job Notes)
Job Notes (from the top menu bar) in Infusion Mobile don't sync back to Infusion.
For Product / Labour Costs added to a Job in Infusion Mobile the Descriptions sync back to the Cost Descriptions (on the Job line)
Narration notes added against Job Cost entries are synced to the Tech Notes section of a Job in Infusion
Nonchargable hours can be put against a Job
Job cost entries deleted in Infusion are removed from Infusion Mobile too.
A Labour code can be set against a user (this must match a Product code in Infusion) Having this set will activate the Labour menu tab in the Job screen. Selecting this option will allow the user to start, stop and restart a timer. The timer can be left running while the user does the work.
Jobs can be set so that only those assigned to the user are displayed on their screen. This is done by having a Rep Code set against the user and the "Filter based on repcode" option selected under the Job section of their Profile. To also view Jobs that haven't been assigned to anyone select the "Show unallocated records" option under the Other Settings section of the Profile.
Order numbers on Jobs sync between Infusion and Infusion Mobile.
Jobs can be filtered by either Tech (assigned) or Status by using the Filter option under the Jobs screen.
Contact details for the three Contacts set against a Job in Infusion will display on the front screen of a Job in Infusion Mobile.
If a new Job is created in Infusion, the Tech it is assigned to is emailed notification of the Job when it syncs up to Infusion Mobile. The email address mobile@infusionsoftware.co.nz may need to be whitelisted in the user’s email software to stop these from going to the Spam folder.
Job Settings Notes
Job costs added into Infusion Mobile can be set to sync when the next sync occurs or when a toggle at the top right hand corner of the Job screen is selected so it changes from red to green. The setting for this is “Require Job Checking for Syncing” under the Settings / Job Settings menu.
Labour can be set to be charged in Hours, Minutes or Units.
A minimum charge for labour can be set.
Labour can be set to be rounded Up, Down, Both or None.
A rounding quantity for Labour can be set.
There is a Configure option in Address Configuration to open maps in a new browser window
Four techs can be assigned to a Job. Techs 2, 3 and 4 need to be added to the Job from within Infusion Mobile. The Job will show on each user’s Job list in Infusion Mobile.
There is an option to not Use Timer (Job Settings) which gives a different display to when the timer is used.
If Units are selected for Labour eg

Then the Nearest value will be used as the quantity unit that labour will be charged in. With above, time will be charged in 15 minute units – so 2hrs of labour will sync back to the Infusion Job with a Quantity of 8.
There is a Profile setting option called "Show jobs on opening screen" (in the Job section) that when selected will display the Job List screen as the first screen when the user logs in.
There is a Job Setting called Admin Jobs that allows selection of a Staff Code (setup in Infusion). With this done all Jobs assigned to the Staff Code will display for all users in Infusion Mobile.
If a Customer Item is linked to a Job in Infusion, data relating to it (ie ID, Key, Customer ID, Description, Note, Warranty Note, Warranty Expiry Date, Serial Number) will sync to the Job in Infusion Mobile. Custom field data for the Item will also display if setup to do so from under Settings / Customer Items Settings.
Products
The Descriptions for Product Prices can be set under Product Settings. Deleting the text in the field will mean the Price Level won't display. If there is no price in Infusion for the Price Level it won't display in Infusion Mobile.
The images for Categories match to the Product Groups in Infusion and need to have a name / title the same as the Group value under Manage Product Groups in Infusion.
Bin Locations for a Product sync from Infusion.
Products set to “Stop All Sales” in Infusion will not display in Infusion Mobile.
The Gallery view sorts by Product Code
There is a Profile setting to “Display Only Include in IM” which if selected will only display Products that have this option selected under the Settings tab of a Product in Infusion.
There is a Profile setting to “Display Only Product Range” which if activated will only display in Infusion Mobile the Products within the From and To Products range selected. This option will take higher priority than the “Display Only Include in IM” setting.
Purchase Orders
Purchase Orders can be created in Infusion Mobile. These will sync back to Infusion and display in the Manage Purchase Orders screen with a status of Ordered. Either Job Management or Stock Purchase Orders can be created. If a Job Management Purchase Order is being created, the Job it is associated with needs to have synced from Infusion. If the Job has just been created in Infusion Mobile, it needs to go through a sync cycle (typically 15 minutes) before the Job is available to be selected from the Job list.
There is a Profile setting to hide the Stock option when creating a Purchase Order.
Items can be added to the Purchase Order by using the Add Product option in the Purchase Order screen. A Purchase Order won’t sync unless at least one item is added to the Purchase Order.
There is a Purchase Order Profile setting called "Auto Add Misc Code" which when selected automatically adds the Product Code set under the MISC field of the "Quote and Invoice Settings" section to a new Purchase Order when it's being created.
Notes added to the header of the Purchase Order sync back to the Notes tab of the Purchase Order in Infusion.
Purchase Orders can be emailed to the Supplier and / or logged in user.
Purchase Order numbers are created using the Purchase Order ID from within Infusion Mobile followed by the text IM eg 1235IM
There is a Profile option (in the Purchase Order section) giving the user an option to manually authorize Purchase Orders so they will be synced on the next cycle. With this option selected a Sync option will display at the top of the Purchase Order. Select this to authorize the Purchase Order. Once done the icon will display with a label of Cancel Sync. Selecting the icon in this state will un-authorize the Purchase Order from syncing. Not having this Profile option selected will mean that any newly created pending Purchase Order (an order with at least one line) will automatically sync on the next cycle.
Calendar
Calendar events can be sent to Outlook in iCalendar format (up to 5 recipients at one time)
General
Numbers can be entered without a leading zero (eg 0.5 can be entered as .5)
An image can be added against Notes in Customers, Leads and Jobs. These don’t sync back to Infusion.
Costs added to a Job in Infusion Mobile will be taken out of the Location the mobile user is set against. Quote and Invoice Locations will be set to the same as the Location set against the mobile user.
The most recently viewed or edited record is shown at the top of the Customer, Lead, Product, Job and Potential lists
A user can login under a new session of a session already logged in. In doing so it will log the other / old session out. A message will display for the new session warning them that they will log the old session out - they can either Cancel or Continue from here.
Desktop Configuration screen
The Reset option tells the sync to run the SQL scripts and send ALL the records. The standard sync keeps track of records and only sends records that have changed. This reduces the size of uploads significantly. It also means it doesn't try to sync when nothing has changed (eg through the night)
Associate an Image with a Customer
An image can't be directly linked to a Customer but it can through a Note. Depending on your requirements you could add a Note from under the Customer's account and associate an Image with this. Each Note can be labelled accordingly for the image eg Store Frontage.
Creating a Template Quote / Invoice
The duplication of a Quote has a few steps in it. To do this:
- a) Go into Infusion and create a Customer called "Templates"
- b) Create and Post an Invoice (with or without prices) against this Customer
- c) Let the Invoice be synced into the Customer history on the mobile device
Now, when you need a template,
- a) Go to the Template Customer first and use the History or Outstanding screen
- b) View the Template invoice on the screen (just like any other invoice)
- c) Use the “Copy Sale” button at the bottom of the screen
The copy will open as a "Draft" against the template account. Use the Swap button to swap it to the Customer (or Lead) you want to use it against
Note: If the original Template invoice has a balance (even if it is 1 cent) it will stay in the "Outstanding" screen in Infusion Mobile. If it has a balance of zero, it will appear on the history screen - but it will disappear after a year. The script can be changed to override this.
Some Basic How To’s
The following instructions assume the user account has been set up with the required permissions.
Create a Customer
To create a Customer in Infusion Mobile go to the
- Customers menu then select +
- Enter the required details then select ü
Creating a Quote / Order / Invoice
To create a Quote, Order or Invoice do either of:
- Customers menu, locate the required Customer then select “Add Quote”
- Quotes and Orders menu, select + then locate the Customer
To add items to the Quote / Order select
- “Add Product” then search for it via:
- Gallery - browse through the images, or
- Quick - see items recently purchased by the Customer, or
- MISC Item - adds the Miscellaneous Product code set up in Infusion, or
- Labour - either start the Labour Timer (the Labour Code set against the user’s account will be added when the timer is stopped) or manually enter the time added.
Create a Job
To create a Job either go to the:
- Customers menu, locate the required Customer, select the “Add Job” icon, or
- Jobs menu, select + then locate / select the Customer
then add the required details
Add Costs To A Job
To add items to a Job, from within the Job select “Add Costs” then
- Search and locate the required item. Once added select “Add Product” to add an item in the same way
- Barcode – scan a barcode on an item
- Labour to either start the Labour Timer (the Labour Code set against the user’s account will be added when the timer is stopped) or manually enter the time added.
Create a Purchase Order
To create a Purchase Order in Infusion Mobile go to the
- Purchase Orders menu then select +
- Select ether Job (for a Job Management P/O) or Stock
- Select the Location (if there are multiple)
- Select the Job (if a Job Management P/O)
- Select the Supplier
- Select “Add Product” and search / locate the Product
- Select “Edit” to Add a Note, delete a line
- Select “Email” to email the P/O
- After the next sync cycle the Purchase Order will display in the Manage Purchase Orders screen in Infusion with a Status of Ordered
Timesheet setup
To take advantage of the Timesheet functionality in Infusion Mobile the Labour Codes in Infusion need to be setup appropriately. To start with each Staff member must have their own Product Group. Each Labour code the Staff member uses needs to have this Product Group set against it eg
John Smith has 3 Labour codes he uses
Code: JS Description: Labour - John Smith
Code: JSN Description: Labour - John Smith Non-chargeable
Code: JS2 Description: Labour - John Smith Double time
Each of which has the Product Group of:
LJS Labour – John Smith
Set against it
Under the User’s account in Infusion Mobile the Lab Group option needs to be set to “Labour – John Smith” (a sync will need to occur after the Product Groups has been created in Infusion for it to display in Infusion Mobile)
This will now mean that when Labour is added to a Job via the Labour menu (and the Timer is not being used) all of the Labour code options in John Smith’s Product Group can be used.
Having done this the Timesheet menu option can be selected and after selecting the required data range option the labour time added to Jobs for all labour codes if the user’s Product Group will display
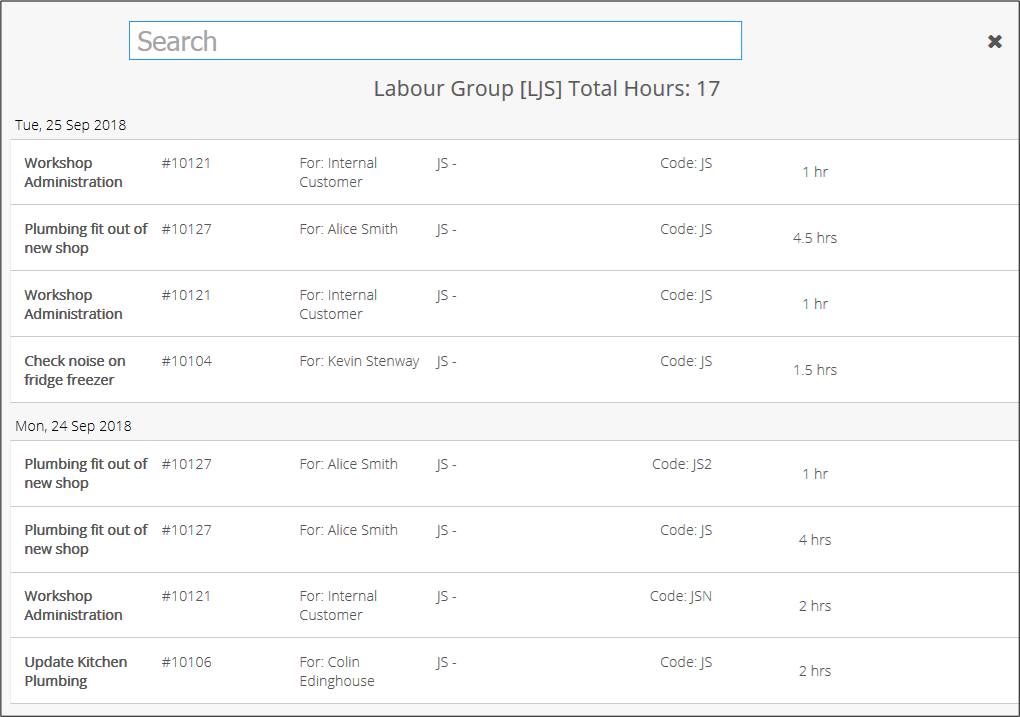
The labour group set against the user can be seen at the top of the screen along with the total number of hours added. The screen displays with the oldest date at the bottom and within each day the earliest time at the bottom.
Only Labour on Active Jobs will display.
Timesheet Entry
The Timesheet Entry screen allows quick entry of Staff / Techs labour onto Jobs.
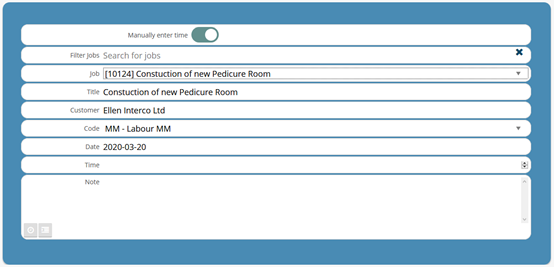
Only Jobs Assigned to the logged in user along with Admin Jobs (Jobs assigned to the Staff Code set in the Admin Jobs option under Settings / Job Settings) will display in the Job dropdown list.
Jobs can be searched for using the Filter Jobs field.
To add Labour a Labour code must be set against the user in their user account. For multiple Labour codes to be available the user must be setup as per the Timesheet Setup above.
The Date of the Labour cost can be set by clicking in the Date field.
The Time entered against a Job can be done as a straight quantity eg 1.5hrs if the “Manually enter time” option is selected. If not selected a Start and End time need to be selected
The icons to the bottom left of the Notes section allow the notes to be Timestamped as well as be added from the Custom Text list setup in Infusion.
The tick icon at the bottom right of the screen must be selected for each Labour entry.
Comments
0 comments
Please sign in to leave a comment.