A Details Panel is available from the Management screens for Customers, Suppliers and Products to provide quick access to information including charts while navigating through these screens.
To make the Details Panel visible select the Details Panel icon at the top right corner of the respective Management screen. This can be switched on or off per user and the preference will be retained while the user is logged in if the user closes and re-loads the Management screen.

The Details Panel will display information relating to the highlighted record on the Management screen. As the user navigates through the list the panel updates displaying the corresponding records data.
If a record displaying on the panel has been updated or changed by another user at the same time, a Refresh button on the top the right corner of the panel helps keep the information updated.
Customer Details Panel
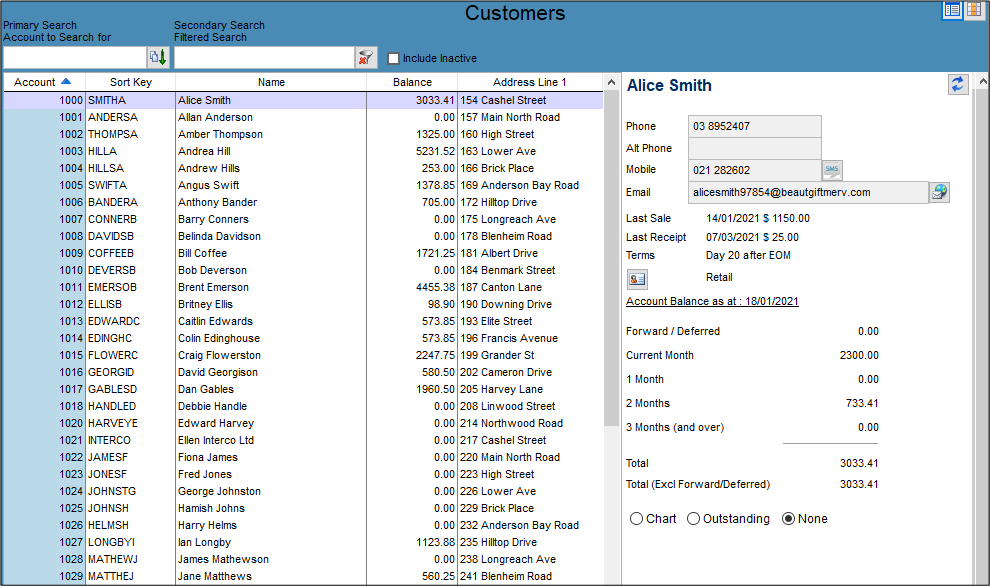
The Customer Details Panel contains three distinct areas: 1) Contact details; 2) Account balance and Contact Management Log; 3) Sales Chart, Outstanding or None.
1) Contact details
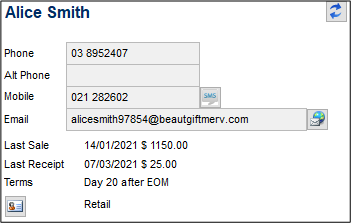
This area displays the main contact details of the account, the date and amount of the last sale and the date and amount of the last payment received as well as the account’s Terms and price level.
If there is a mobile number stored on the Details screen of the Customer’s account the SMS icon will be visible to the right of the Mobile field allowing the SMS screen to be opened and the sending of a message to that number - provided the Software is set for SMS (Admin / Defaults / Manage SMS Defaults).
If there is an email address stored on the Details screen of the Customer’s account the Email icon will be visible to the right of the Email field allowing opening of the email screen of the local email application to send an email to that address.
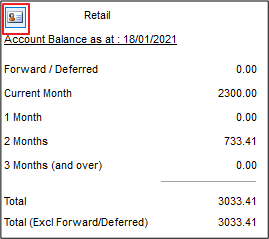
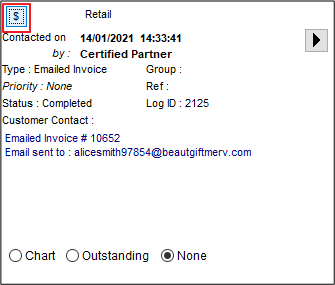
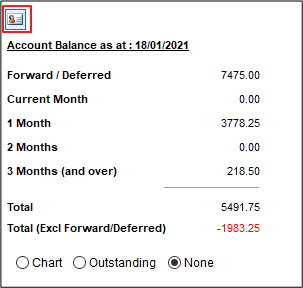
2) Account Balance and Contact Management Log
The icon on the left allows switching between the Balances of the account or the Contact Management Log.
The balances are based on the Customer’s terms. If there are no outstanding balances, the message “No Balance” appears in this area.
When the Contact Management Log is visible, if there is more than one event arrows appear on the right allowing navigation through these. If there is no log on that record, the message “No Contact Management Log available” appears in this area.
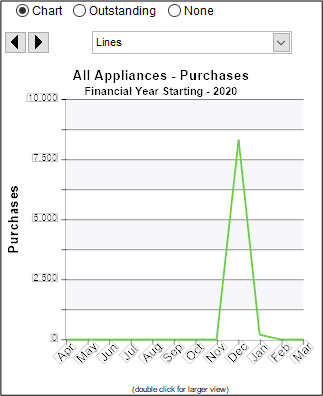
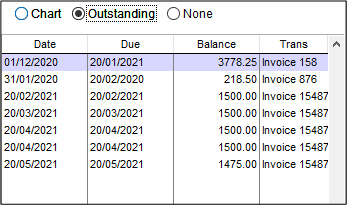
3) Chart, Outstanding and None
The radio buttons at the top of this area allow switching between the Sales Chart, the Outstanding transactions list or none.
When the Sales Chart is visible the sales information is displayed by financial year period showing by default the current financial year period in the software.
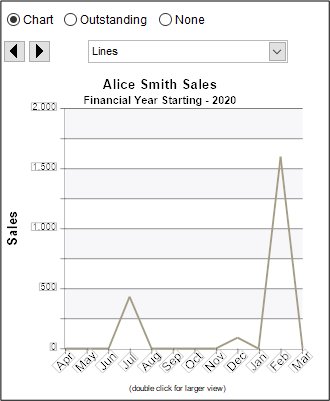
The arrows on the top left allow navigation to different financial yearThe dropdown menu allows for selection of various chart formats to display the data in.
Double click on the chart for a larger view. This screen also allows for configuration of different preferences on that active maximised screen by using the options of the bottom row.
Important Notice!!
Having the Sales Chart option on display MAY slow down the navigation per Item on some networks.
When the Outstanding grid is visible, posted unpaid transactions will display on the grid.
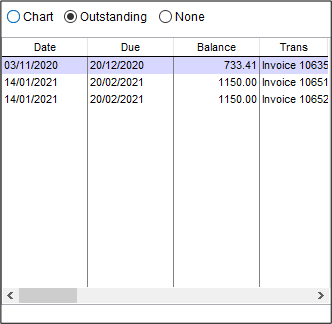
Shortcuts are available when a transaction is highlighted:
- Double click opens the transaction in Read-Only mode
- Right click gives the option to open the transaction in print preview or the drill down.
Supplier Details Panel
The Supplier Details Panel contains three distinct areas: 1) Supplier details, 2) Account balance and Contact Management Log, 3) Purchases Chart, Outstanding or None.
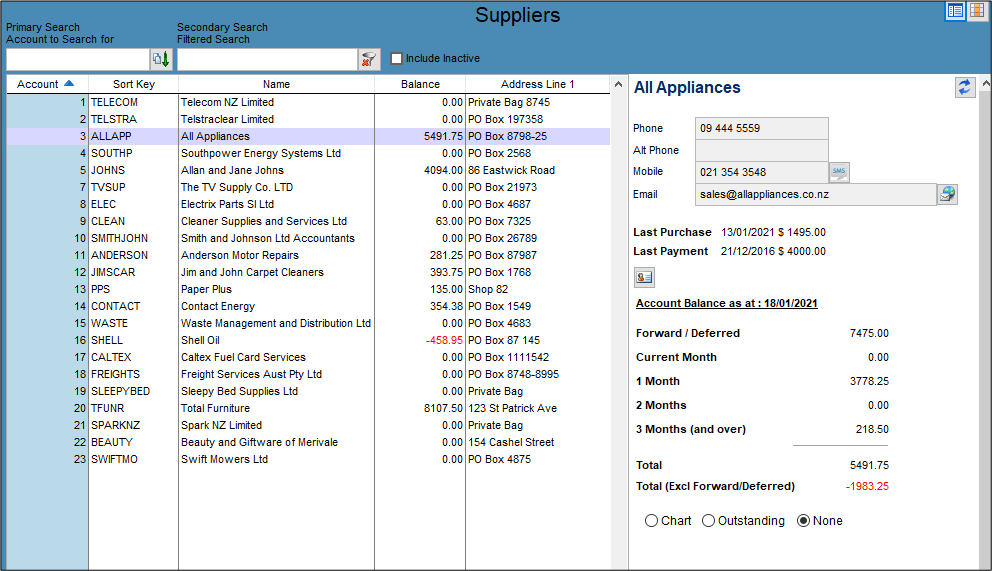
1) Contact details
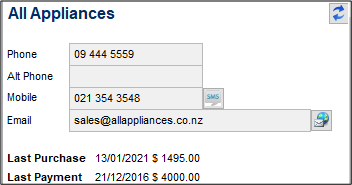
This area displays the main contact details of the account, the date and amount of the last purchase and the date and amount of the last payment made.
If there is a mobile number stored on the Details screen of the Supplier’s account the SMS icon will be visible to the right of the Mobile field allowing opening of the SMS screen to send a message to that number - provided the Software is setup for SMS (Admin / Defaults / Manage SMS Defaults).
If there is an email address stored on the Details screen of the Supplier’s account the Email icon will be visible to the right of the Email field allowing opening of the email screen of the local email application to send an email to that address.
2) Account Balance and Contact Management Log
The icon on the left allows switching between the balances of the account or the Contact Management Log.
The balances are based on the Supplier’s terms. If there are no outstanding balances the message “No Balance” appears in this area.
When the Contact Management Log is visible, if there is more than one log, arrows appear on the right allowing navigation to other contact events for that Supplier. If there is no log on that record the message “No Contact Management Log available” appears in this area.

3) Purchases Chart, Outstanding or None
The radio buttons at the top of this area allow switching between the Purchases Chart, the Outstanding window or none.
When the Purchases Chart is visible, the purchases information is displayed by financial year period, showing by default the current financial year period in the software. The arrows on the top left allow navigation to different financial year periods.
The dropdown menu allows selection of different chart formats to display the data in.
Double Click on the chart for a larger view. This screen also allows configuration of different preferences by using the options of the bottom row.
Important Notice!!
Having the Purchases Chart option on display MAY slow down the navigation per Item on some networks.
When the Outstanding grid is visible, posted unpaid transactions will display on the grid.
Shortcuts are available when a transactions is highlighted:
- Double click opens the transaction form on Read-Only mode
- Right click gives the option to open the transaction in print preview or the drill down.
Products Details Panel
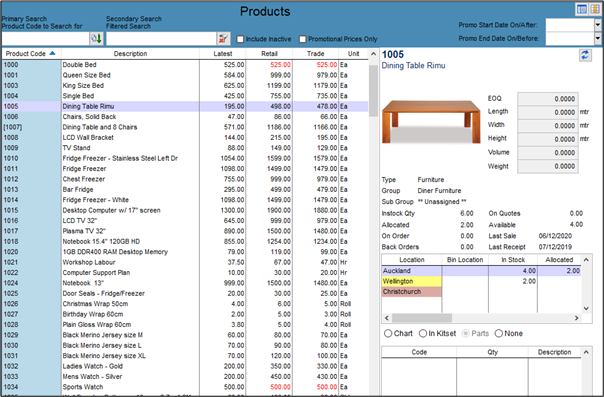
The Products Detail Panel contains two distinct areas: 1) Product Details and 2) Chart, In Kitset, Parts, None.
1) Product details
This area displays the the categories of the item (Product Type, Group and sub-Group), Dimensions, Economic Order Quantity (EOQ) if available, the date of the last sale and last receipt, as well as the quantities.
There is also a grid showing the Bin Location and quantities breakdown per active location active.
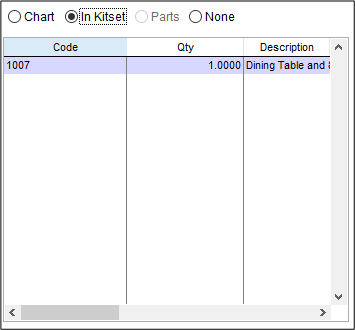
2) Chart, In Kitset, Parts, None
The radio buttons at the top of this area allow switching between the Product Chart, the In Kitset window, the Parts window or none.
When the Product Chart is visible there are several options to choose. Firstly, there is a tickbox for “All Locations”. If this is selected the chart will show the information based on all locations, otherwise it will display the information of the location highlighted on the grid above the chart on the product details area.
Using the radio buttons the chart can show information of quantities, sales ($ values) and sales vs costs.
The information is displayed by financial year period, showing by default the current financial year period in the software, the arrows on the top left allow to navigate different financial year periods.
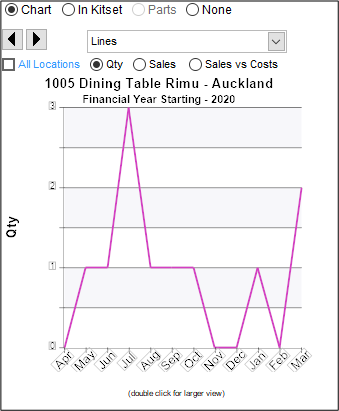
The dropdown menu allows for selection of various chart formats the data can be displayed in.
Double Click on the chart for a larger view. This screen also allows for configuration of preferences by using the options of the bottom row.
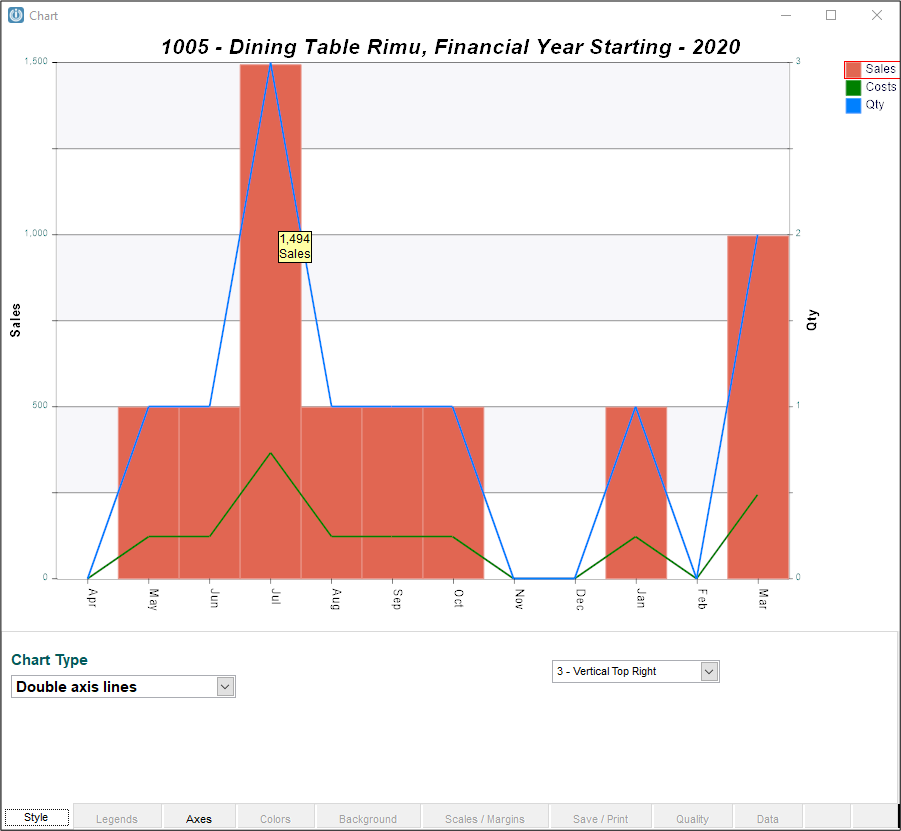 Important Notice!!
Having the Product Chart option on display MAY slow down the navigation per Item on some networks.
When the In Kitset grid is visible, if the record on display is a component of a kitset it will display on the grid the quantities used per kitset.
Shortcuts are available when a component is highlighted:
- Double click opens the Kitset Product code modify screen
- Right click gives the option to open the kitset setup screen
The Parts radio button is enabled if the record on display is a kitset. When the Parts grid is visible it will display details of the components of the kitset on the grid. Shortcuts are available when a component is highlighted:
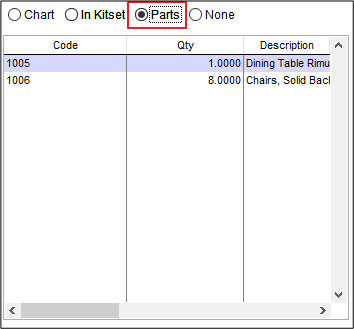
- Double click opens the component Product code modify screen
Comments
0 comments
Please sign in to leave a comment.